Question Banks and Question Types
| Site: | Watt Education |
| Course: | Setting up a Moodle Course |
| Book: | Question Banks and Question Types |
| Printed by: | Guest user |
| Date: | Saturday, 18 July 2026, 1:35 AM |
1. Setting up Your Question Bank
If you’re going to conduct regular assessments, it’s convenient to use a question bank.
A question bank in Moodle is an overall stock of all the questions and tasks you’ve ever created on the platform. This feature saves time since there’s no need to create everything from scratch: if you need to prepare a test for a new course, you can simply copy ready-made questions or tasks from the bank.
You have two options with tests: you can import/export quizzes you have already created, or you can create new quizzes with the questions from your question bank.
Any questions you have already created will already be in the question bank. But now we are going to create new ones.
Step 1: To open a question bank, click the gear icon and select More.
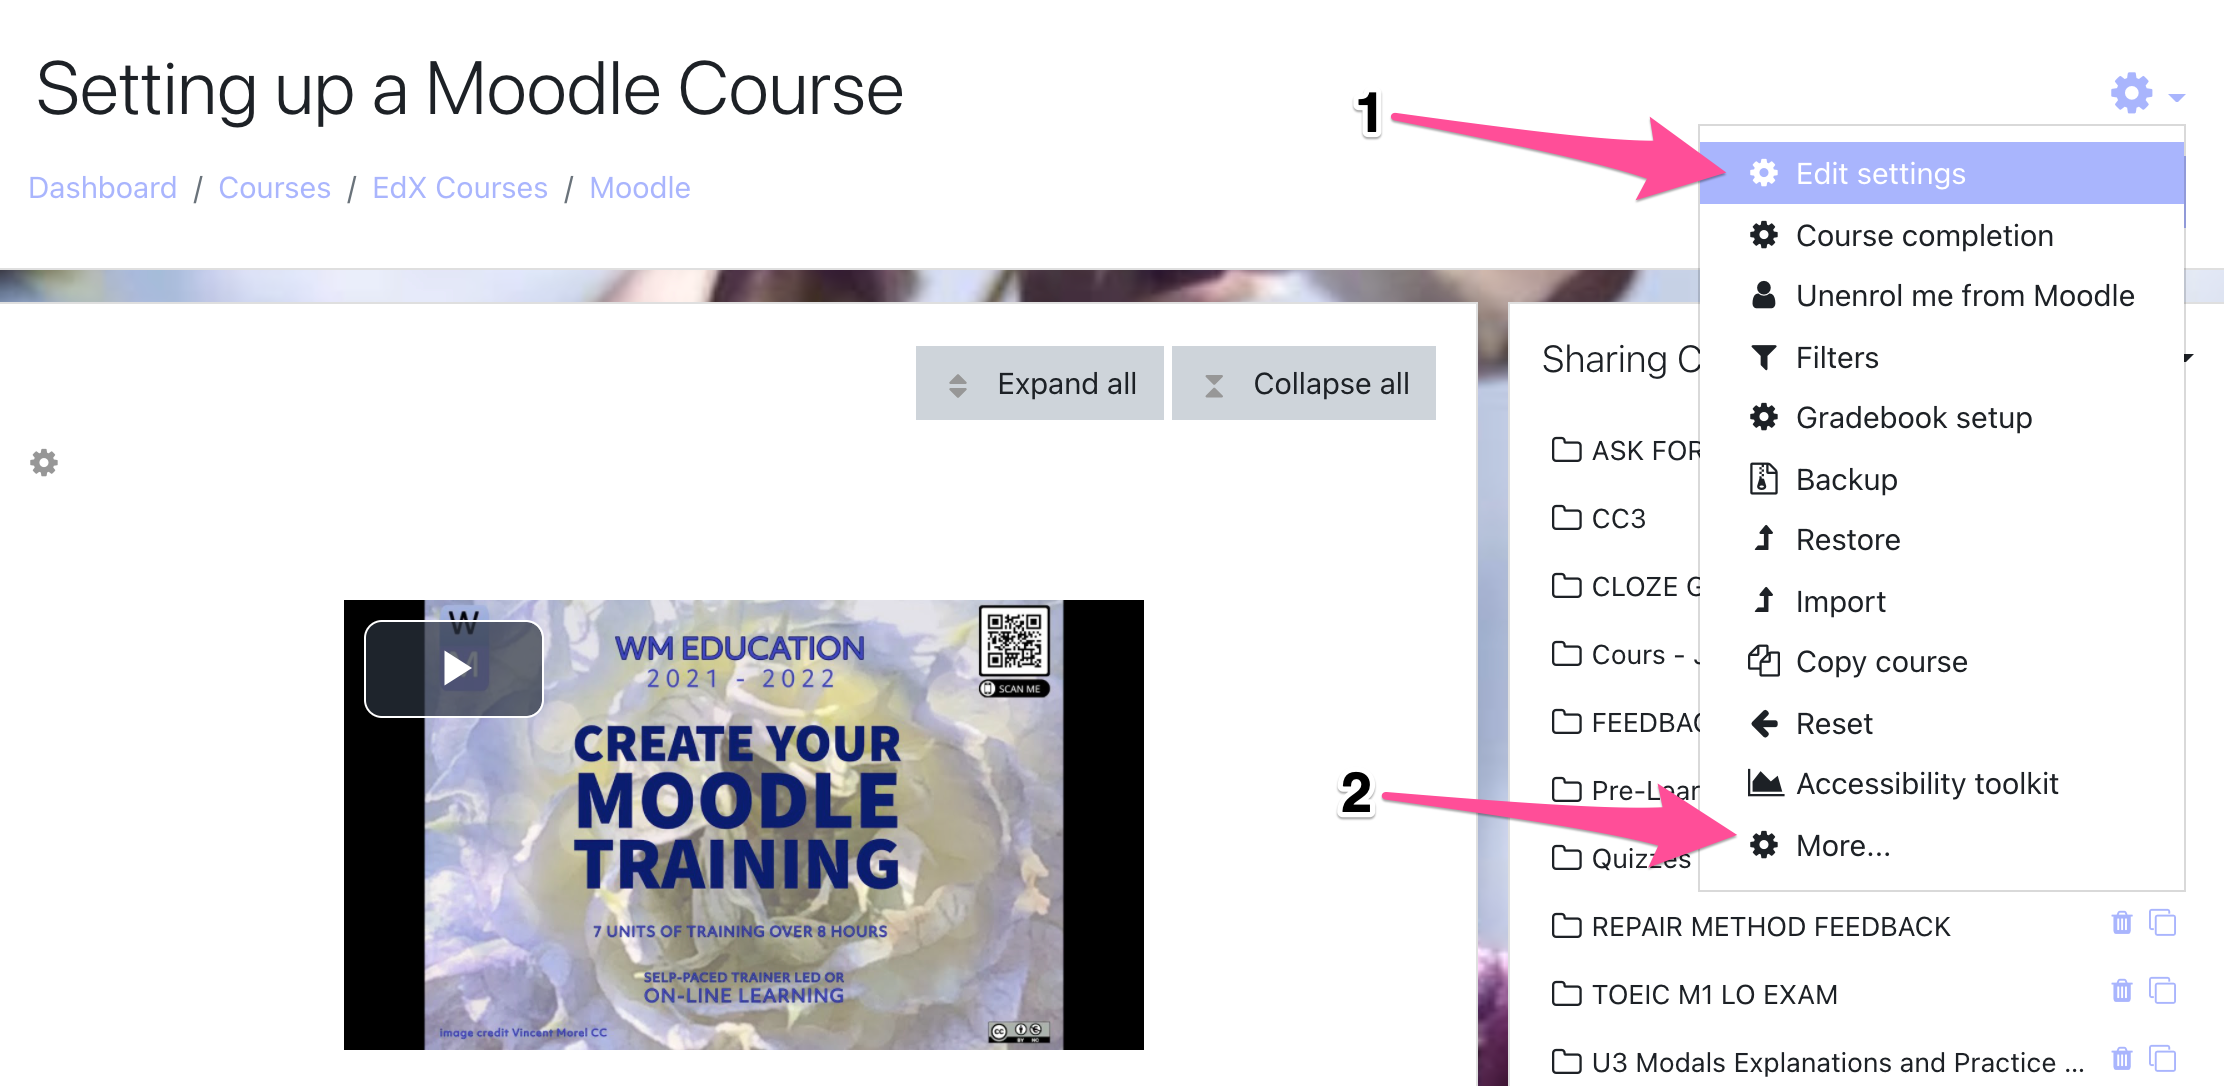
Step 2: Scroll down under Course administration and you will see the Question bank section.
· Questions
· Categories
· Import
· Export
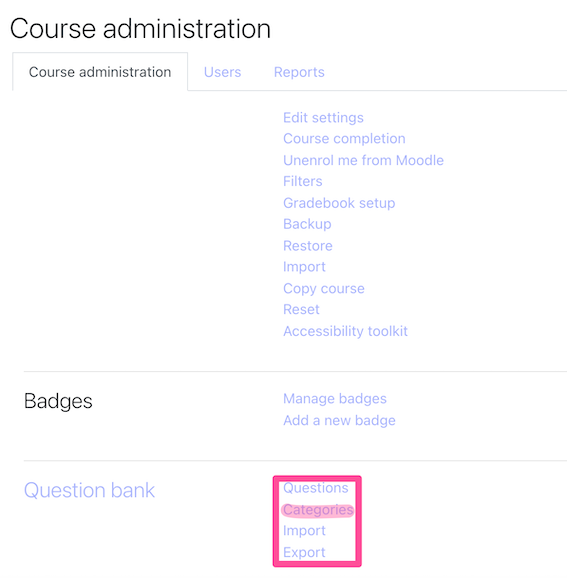
Step 3: Click on Categories. You will probably want to create different categories and different sub-categories. Categories can be further divided into sub-categories, with further sub-categories, for example:
- Grammar
- Verbs
- Present Tenses
- Past Tenses
- Future Tenses
- Verbs
- Vocabulary
- Marketing
The categories that you create are the frame within which you will be creating your questions.
Step 4: Go ahead and create a few categories.
Step 5: Once you have created a category you can click on it and it will bring up the following window

Naming your categories with care and naming your questions is vital, so that you can find them again.
2. Creating Questions
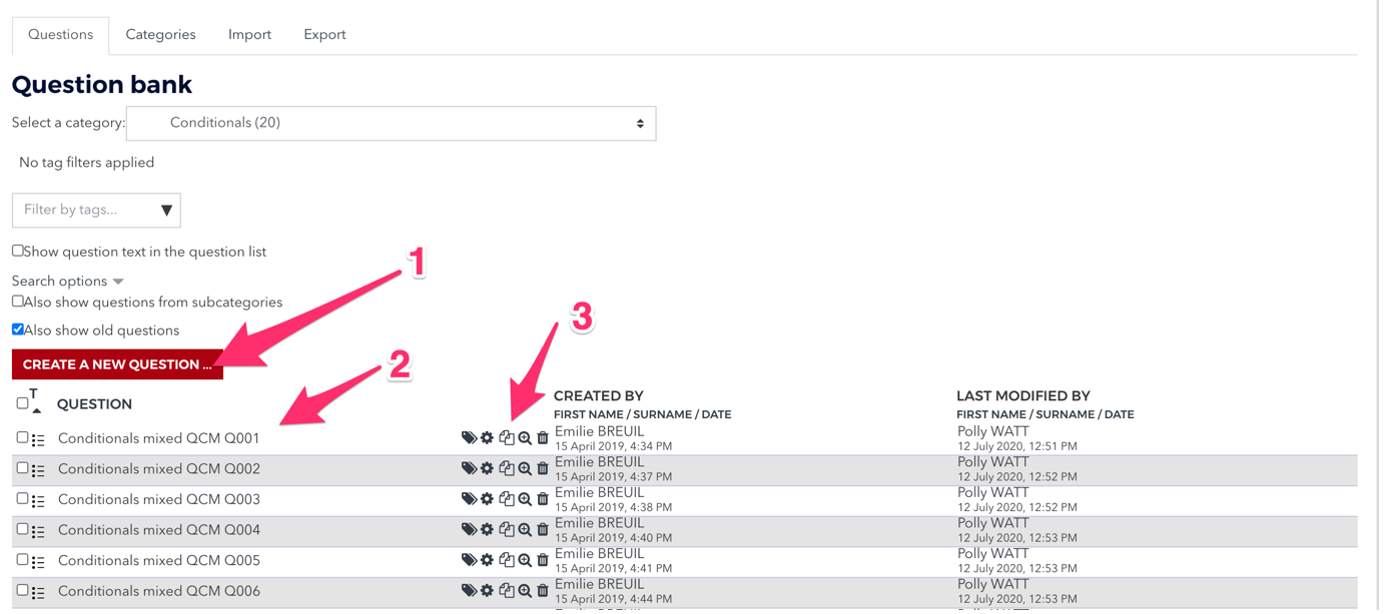
Click on Create a new question – and this is where things start to get more complicated.
You have a range of choices for creating quizzes, but I have just included 5:
- Multiple choice
- True/False
- Short answer
- Random short answer
- Select missing words
When you create questions, add more questions than you will use in a test – so for a 20 question test the ideal would be to have 30+ questions, this will ensure that all the students have different questions during a quiz – ensuring that cheating will be harder.
You can use your questions to create an in-class quiz where no two students will have an identical quiz, hopefully making in-class cheating much harder.
The question bank keeps all the questions you have ever created (provided that you've organized them in a way that allows you to find them again).
3. Multiple Choice Questions
In response to a question (that
may include an image), the respondent chooses from multiple answers. There are
two types of multiple-choice questions - single answer and multiple answers.
Example of a multiple-choice question:
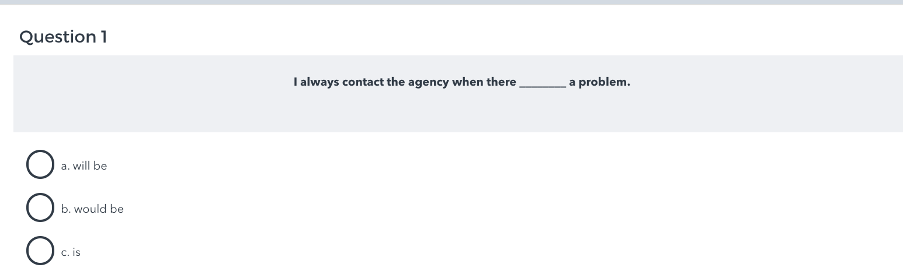
Question set-up
Step 1: In the Question Bank, select the desired question category, then click Create a new question... and pick Multiple choice. The Adding a question screen will open.
Step 2: Give the question a descriptive name - this makes it easy to identify it in the question bank. The question name is not visible to students.
When you create a question you will generally be creating a series of questions – so here we have used the kind of grammar “Conditionals mixed” the type of question “QCM” and the question number.
Step 3: Enter a passage of text into the Question text field. Images, audio, and video can also be inserted into this field using the HTML editor toolbar.
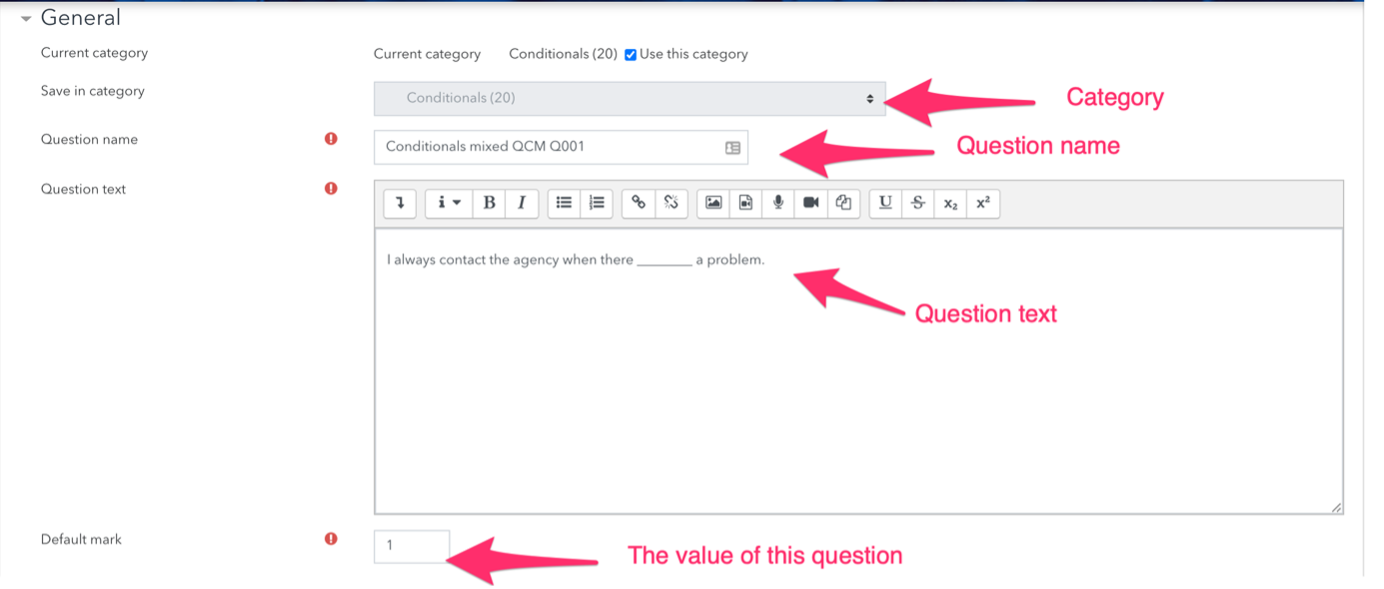
Step 4: Set the Default mark by entering a numerical value (i.e. the maximum number of marks for this question).
Step 5: Choose whether students can only select one answer or multiple answers.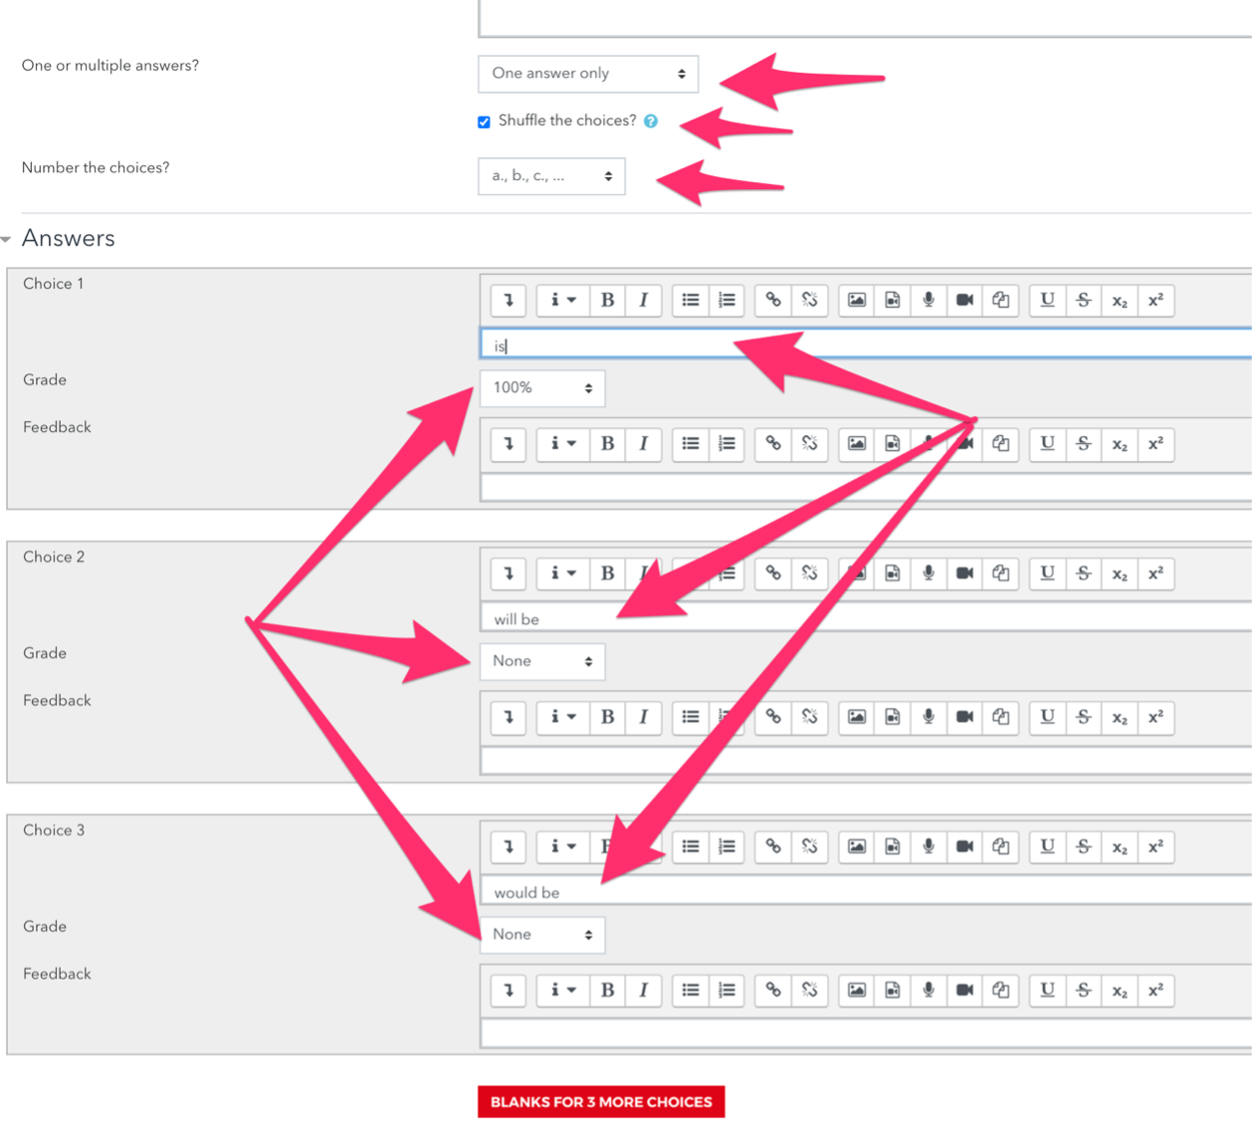
Step 6: Choose whether to shuffle the answer options – I’d recommend always choosing to shuffle as it makes cheating a lot harder for students.
Step 7: Write the first answer in the Choice 1 text field. This will be one of the possible answers that students can select. In addition, select a grade percentage for this answer, 100% to mark it as the correct answer.
Selecting values less than 100% will assign partial credit. Fill in the rest of the response choices in the rest of the form. Any unused areas will be ignored.
Note: At least one of the choices needs to be marked as 100%.
Step 8: Click Save changes to add the question to the category.
Step 9: Click on the double page symbol to copy your question. This is the best way to create a series of the same type of questions with the same settings.
Step 10: Change the number of the new question to Q002 in the series and fill in the new question text and answer text. Always put the correct answer in field one.
Step 11: Create more questions than you will use in your test – so for a 20 question test the ideal would be to have 30+ questions, this will ensure that all the students have different questions during a quiz – again ensuring that cheating will be harder.
You can now use your questions to create an in-class quiz where no two students will have an identical quiz, hopefully making in-class cheating much harder.
The question bank keeps all the questions you have ever created.
4. True/False Questions
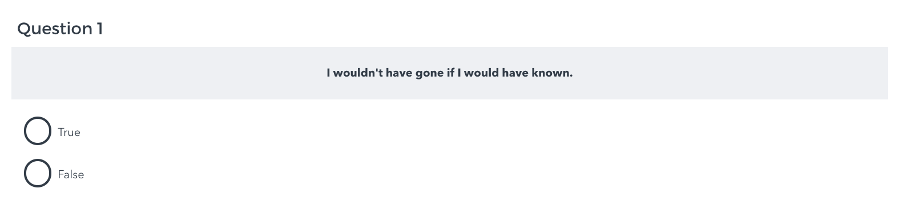
In response to a question (the text for which may include an image), the student selects either True or False.
Example of a True/False question:
Question Set-Up
Step 1: In the Question Bank, select the desired question category, then click Create a new question... and choose True/False. The Adding a question screen will open.
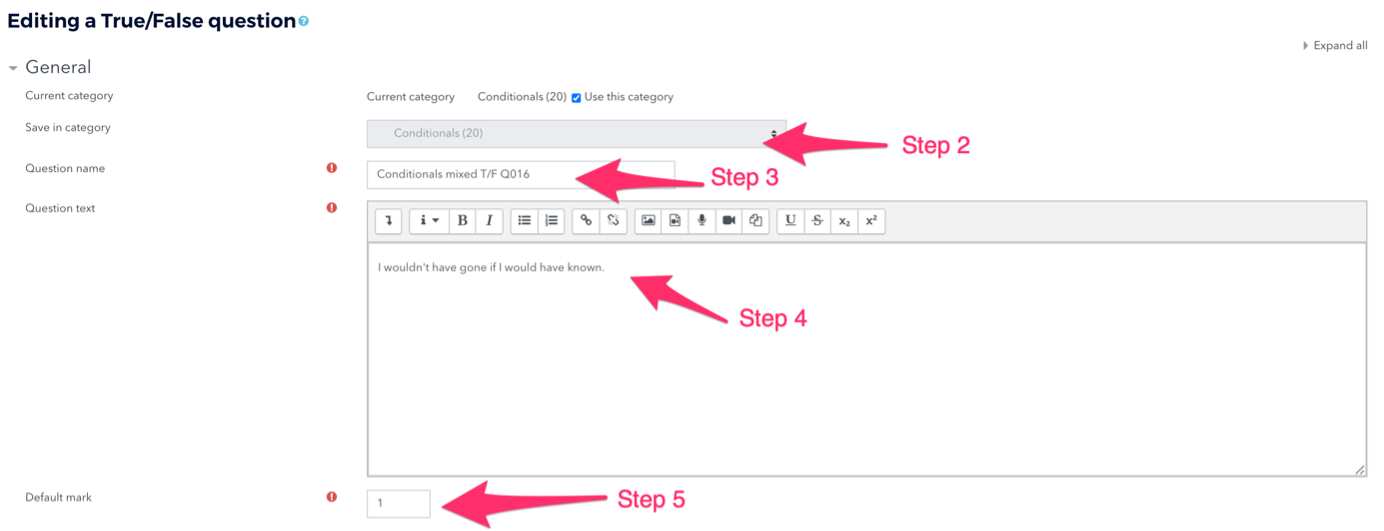
Step 2: Check the category – make sure the question is where you want it to be. Here that’s under Conditionals.
Step 3: Give the question a descriptive name - this makes it easy to identify it in the question bank. The question name is not visible to students.
Step 4: Enter a passage of text into the Question text field that can be answered as either True or False. Images, audio, and video can also be inserted into this field using the HTML editor toolbar.
Step 5: Set the Default mark (question grade) by entering a numerical value (i.e. the maximum number of marks for this question).
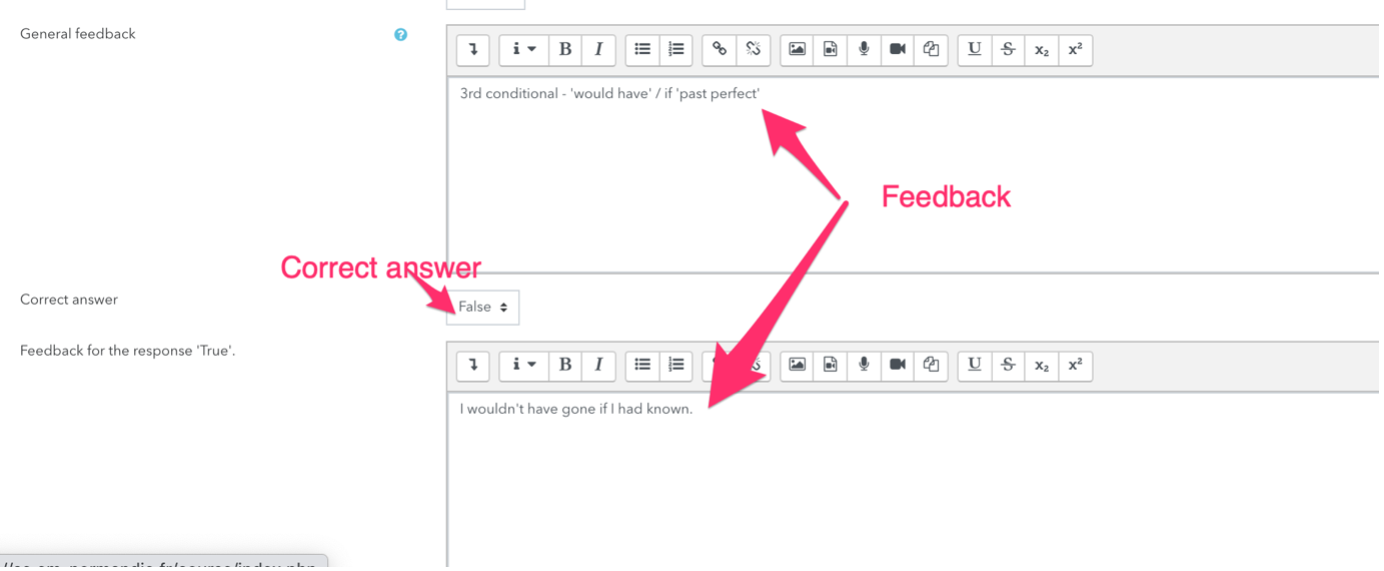
Step 6: Set the Correct answer as either True or False.

Step 7: (Optional) Enter textual feedback for when students mark either True or False in the feedback fields.
Step 8: Click Save changes to add the question to the category.
5. Short answers

Short answer questions require respondents to type a word or phrase in response to a question (that may include an image). Answers may or may not be case sensitive and can include more than one correct answer. Acceptable answers can be a word or a phrase, but must match one of your correct answers exactly. It is a good idea to keep the required answer as short as possible to avoid missing a correct answer that is phrased differently.
Example of a short answer question:

Create a Short Answer Question
Step 1: In the Question Bank, select the desired question category, then click Create a new question... and choose Short answer. The Adding a question screen will open.
Step 2: Check the category – make sure the question is where you want it to be. Here that’s under Vocabulary, Finance and Investment.
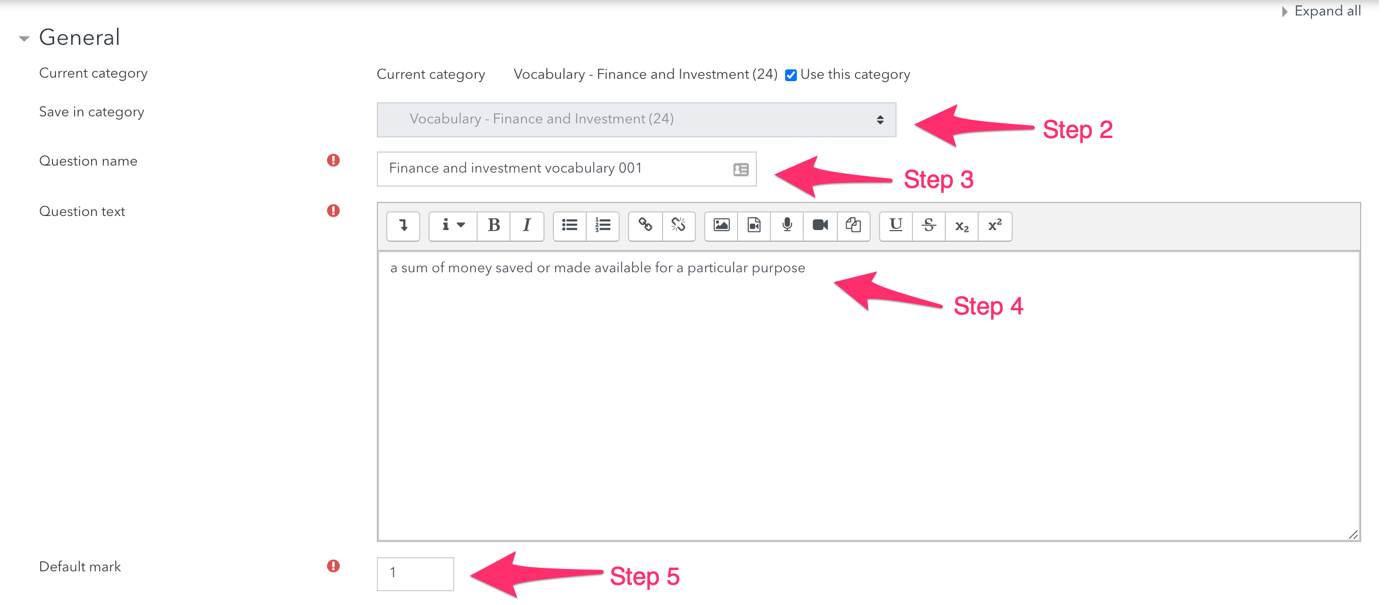
Step 3: Give the question a descriptive name - this makes it easy to identify it in the question bank. The question name is not visible to students.
Step 4: Enter a question in the Question text field to tell the students what they are matching (Such as "Match the invention to its inventor"). Images, audio, and video can also be inserted into this field using the HTML editor toolbar.
Tip: if the answer is intended to fill a gap in the text, use underscores ( __ ) to indicate where the gap is.
Step 5: Set the Default mark grade (i.e. the maximum number of marks for this question).
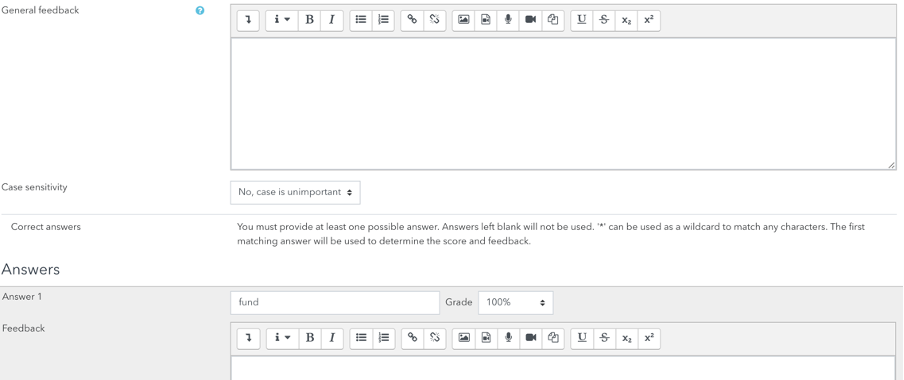
Step 6: Choose whether the answers are case-sensitive. Case sensitivity can be tricky where capitalisation is important.
Step 7: Fill in the answers you will accept. Fund, fund, funding
Step 8: Add grade for each answer. To mark correct answers, select 100%.
Step 9: (Optional) You can also select wildcard answers that will award credit or partial credit for a response
Step 10: Click Save changes to add the question to the category.
After creating a question, be sure to check to make sure the question works correctly. Click edit next to the question in the Question bank to view a preview of the new question.
6. Random Short Answer Matching
You can create a quiz using multiple short answer questions, using the method in Create a Short Answer Question above. In each question fill in just one answer. To a student this will look like a standard matching quiz.
Matching questions provide a list of sub-questions along with a list of answers. The respondent must "match" the correct answers with each question.
Example of a random short answer matching quiz question:
Step 1: In the Question Bank, select the desired question category, then click Create a new question... and choose Random short answer. The Adding a question screen will open.
Step 2: Check the category – make sure the question is where you want it to be. Here that’s under Vocabulary, Finance and Investment.
Step 3: Give the question a descriptive name - this makes it easy to identify it in the question bank. The question name is not visible to students.
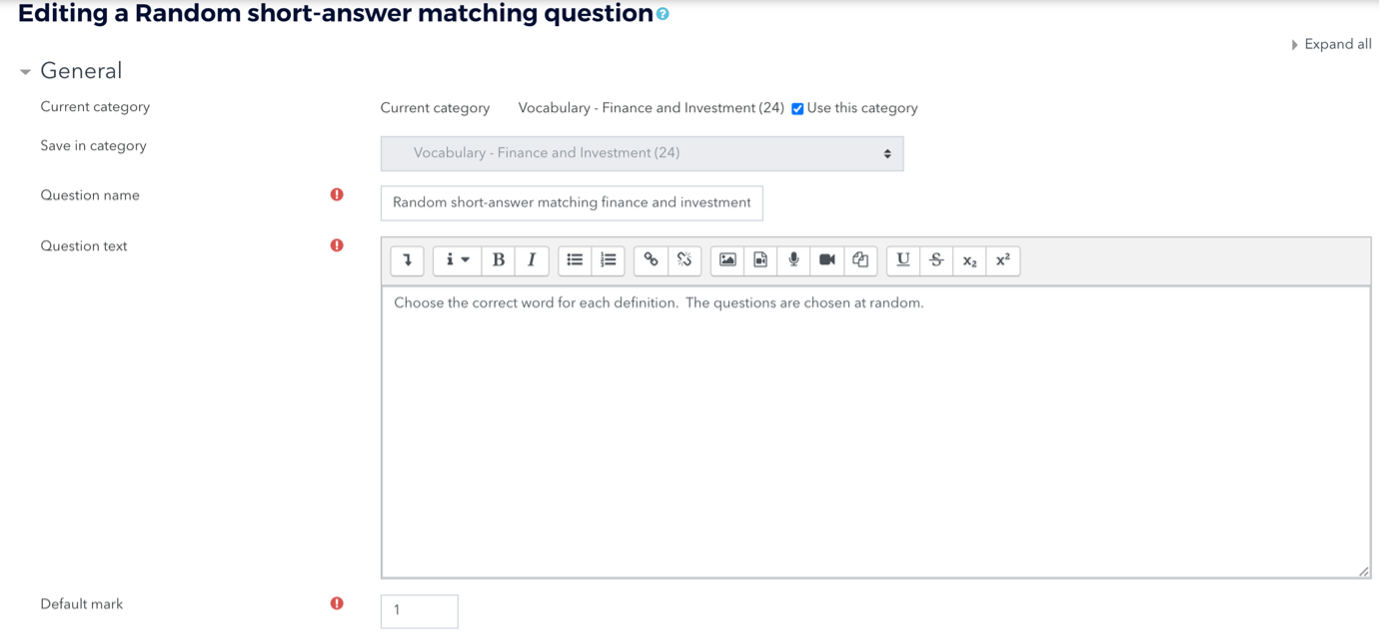
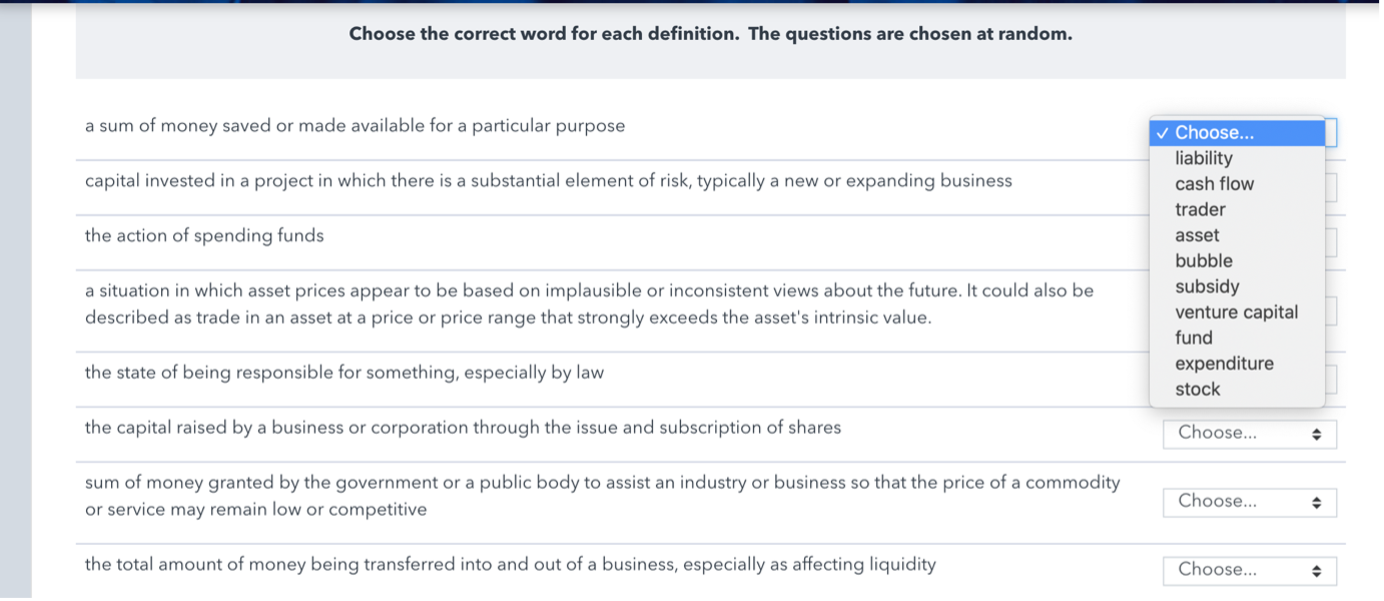
Step 4: Enter a question in the Question text field to tell the students what they are matching such as “Choose the correct word for each definition. The questions are chosen at random.”
Step 5: Set the Default mark grade (i.e. the maximum number of marks for this question).
Step 6: For Number of questions to select choose up to 10. This will take 10 of your short answer questions in this category and use them and their answers.
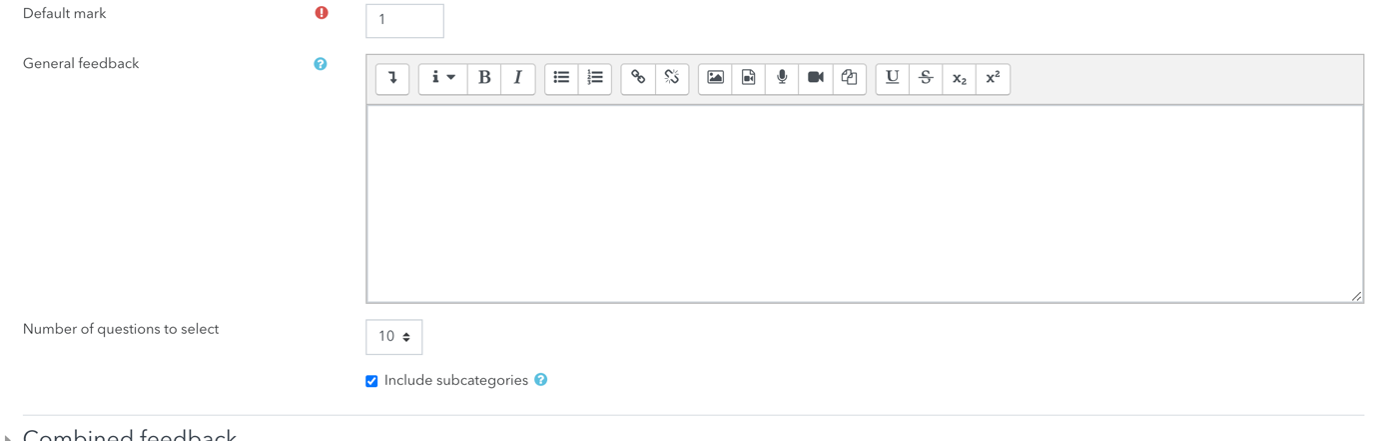
Step 7: Tick the include subcategories box.
Step 8: Click Save changes at the bottom.
After creating a question, be sure to check to make sure the question works correctly. Click edit next to the question in the Question bank to view a preview of the new question.
7. Select Missing Words Questions
Select missing words questions allow instructors to create questions that require students to select words or phrases from a drop-down menu embedded into a question text.
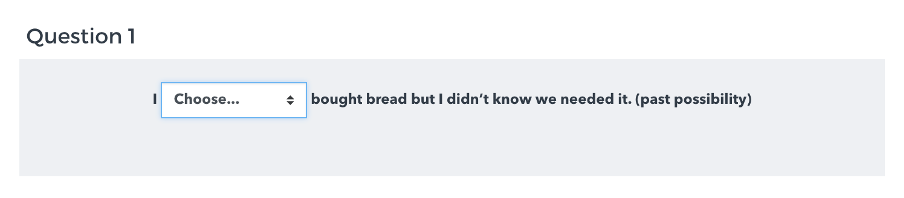
Example of a missing word question matching quiz question:
Step 1: In the Question Bank, select the desired question category, then click Create a new question... and choose Missing words. The Adding a question screen will open.
Step 2: Check the category – make sure the question is where you want it to be. Here that’s under Vocabulary, Finance and Investment.

Step 3: In the Question name field, enter a descriptive name. This will make it easy to identify the question in the question bank.
Note: The question name is not visible to students.
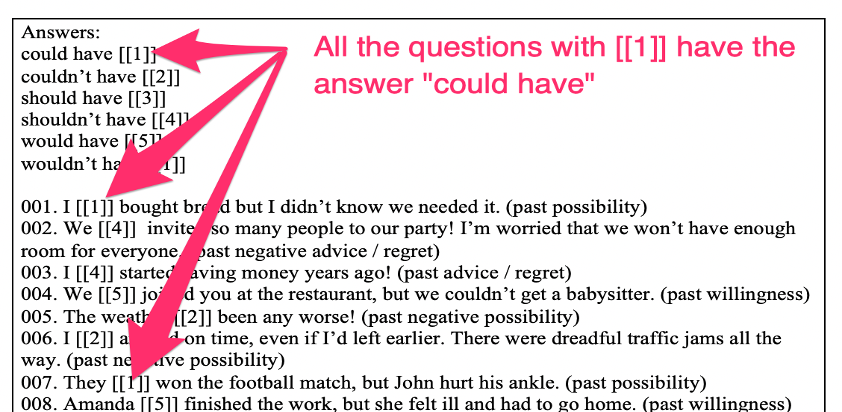
Step 4: In the Question text field, enter the text in which you want your students to select missing words. To create a drop-down menu in the text, enter a [[number]] within double brackets. For example, if your first drop-down is [[1]], you will enter the correct answer for that dropdown as Choice 1 in Step 7.
Note: You can reuse an Answer multiple times in a question—just enter in the same [[number]] in each location in the question text where you want that answer to be the correct choice.
Step 5: Set the Default points for this question, which is the maximum points for the question.
Step 6: Select Shuffle to randomize the answers that appear in drop-downs.
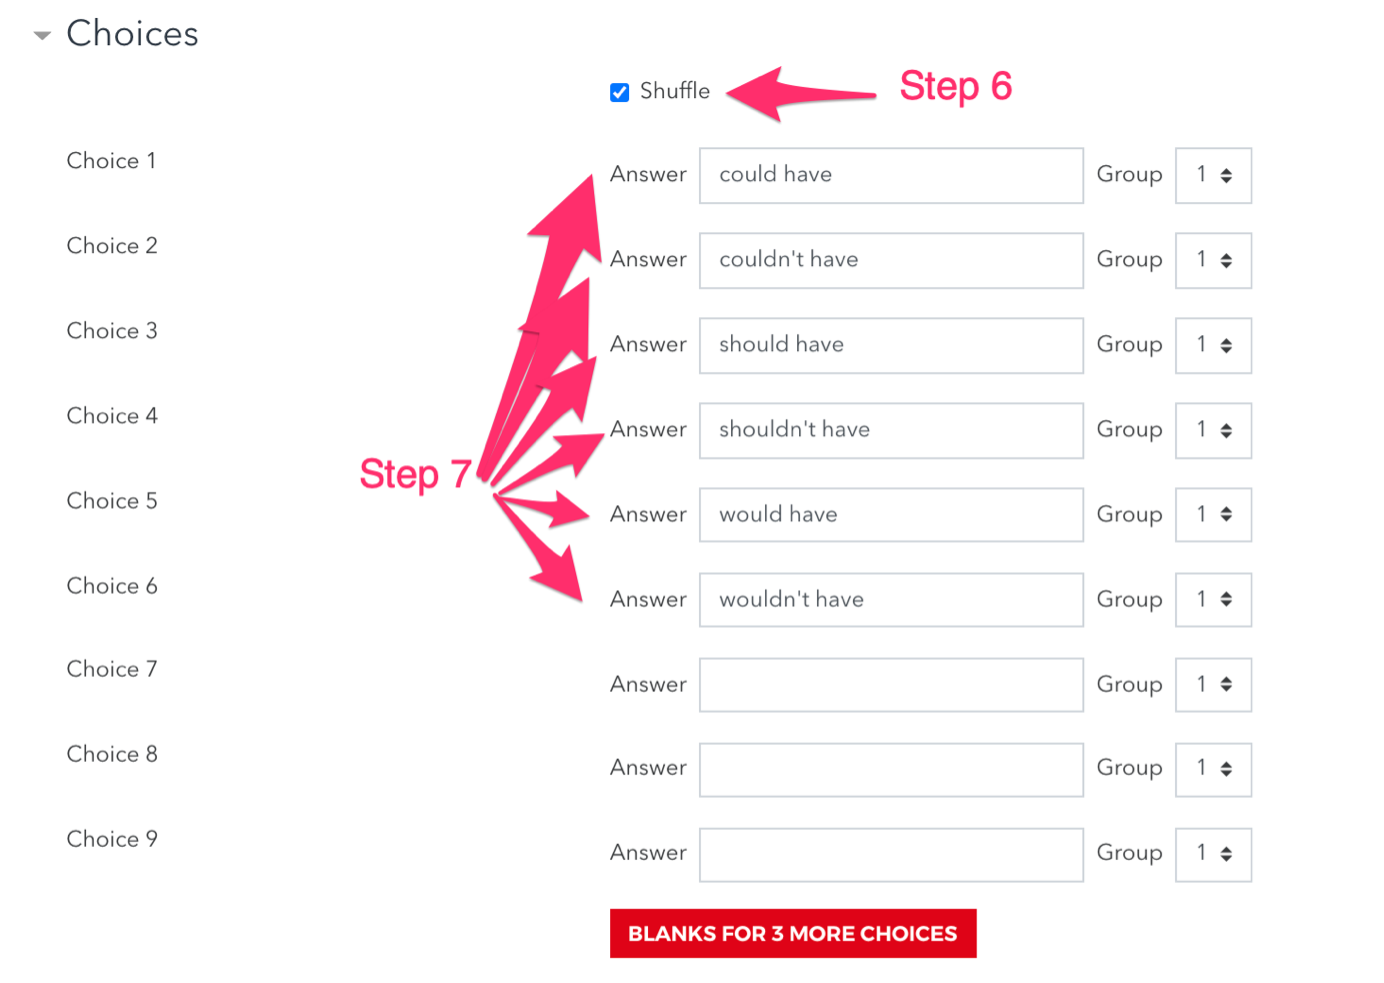
Step 7: Under Choices:
For each [[number]] you have entered, in the corresponding numbered Answer field, enter the correct answer that students should select from each drop-down menu. For example, for the question “I [[1]] bought bread but I didn’t know we needed it. (past possibility)”, the Answer field for Choice 1 should read "could have".
- Note: Each [[number]] entered in the question text must have a corresponding Answer under Choices.
- To add extra choices to drop-downs (i.e., incorrect answers), complete additional Choices using Choice numbers that are not associated with a correct [[number]] in the question text.
- When you have more than one drop-down in a question, you can set restrict answers to particular drop-downs according to the order the drop-downs appear in the question, by setting the Group option for Answers. Answers set to Group 1 will appear only in the the first drop-down to appear in the text, and Answers set to Group 2 will appear only in the the second drop-down, etc.
Step 8: Click Save changes to add the question to the category. You will be returned to the Question bank page.
Step
9: To make sure the question works correctly
click Preview ( ![]() ) next to the question in the
Question bank. An interactive preview of the new question will open in a pop-up
window.
) next to the question in the
Question bank. An interactive preview of the new question will open in a pop-up
window.
7.1. Shortcut for Missing Word Questions
Alternatively, it is possible to create a short cut using a Word document.
Step 1: Create a word document so that the answers for each question always have the same number in brackets.
Step 2: Create your first question and format it as above. Then save it.
Step 3: Copy your question using the double page symbol. This will copy the question exactly – so all the answers will remain the same.
Step 4: Change the question number.
Step 5: Copy in question 2 from the Word document and scroll down and Save changes.
Step 6: Repeat steps 3 to 5 until you have added all your questions.